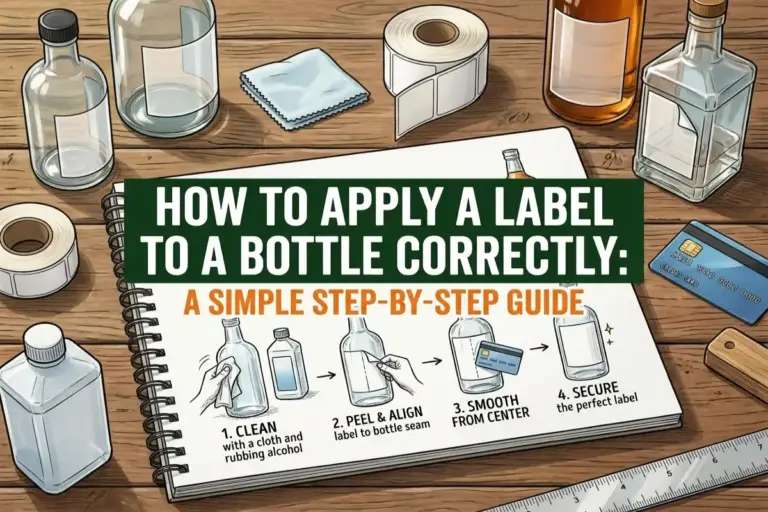
How To Apply a Label to a Bottle Correctly (So It Never Peels, Bubbles, or Sits Crooked)
You worked so hard on your product. You picked the scent, mixed the formula, and bottled it with care. Then you peel off the label, press it on, and… it slides crooked. A bubble pops up in the middle like it’s mocking you. Your heart sinks a little.
If you have ever felt that small wave of disappointment, you are not alone. Knowing how to apply a label to a bottle correctly is the difference between a product that looks like it came from a trusted brand and one that looks like a rushed afternoon project. The good news is that this skill is easy to learn, and it takes only a few minutes once you know the steps.
This guide will walk you through everything, from prep to the final smooth press, so your bottles look clean, proud, and ready to sell.
Why a Crooked Label Can Cost You Sales
Let’s be honest. People judge a product by how it looks before they even read what is inside it. A crooked or bubbly label sends a quiet message that says “this was made in a hurry.” That is not the story you want to tell.
A clean, straight label does something powerful. It builds trust in just two seconds. It tells your customer that if you cared this much about the outside, you probably cared just as much about what is inside the bottle.
This is not just about looks either. A poorly applied label can:
- Peel off during shipping and arrive damaged
- Trap moisture and grow mold underneath
- Make your product look like a copy instead of a brand
- Lose you repeat customers who simply do not trust the packaging
So before we even talk about technique, understand this. Learning bottle label application tips is really learning how to protect your sales and your reputation.
What You Need Before You Start
You do not need a fancy setup. Most of these items are probably already sitting in your home or workspace.
- Clean, lint-free cloth
- Isopropyl alcohol (a simple rubbing alcohol works fine)
- Your custom labels with the adhesive backing still on
- A bone folder, an old gift card, or your fingers
- A flat, well-lit table
- Bottles at room temperature
That last point matters more than people think. A bottle that is cold, sweaty, or fresh out of the fridge will fight you every step of the way.
How To Apply a Label to a Bottle Correctly: Step By Step
This is the heart of it. Follow these steps slowly the first few times, and soon your hands will move through them without even thinking.
Step 1: Clean and Dry the Bottle
Wipe the bottle down with your alcohol and cloth. This removes oil, dust, and any leftover residue from the bottle’s surface. Skipping this step is the number one reason labels lift off later.
Let the bottle dry completely. Even a tiny bit of moisture will trap air underneath your label and cause a bubble.
Step 2: Let the Bottle Reach Room Temperature
If your bottles were stored somewhere cold or humid, give them time to warm up. Adhesive needs a steady surface temperature to stick the way it should. A cold bottle weakens the adhesive’s grip from the very first second.
Step 3: Find Your Starting Point
This step solves the most common worry people search for, which is how to put a label on a bottle straight. Use a simple trick: place a small piece of tape vertically down the side of the bottle as a guideline. Line up the edge of your label against that tape.
You can also use a label applicator tool if you are doing a larger batch. It holds the label steady so your hands do not shake or drift while you work.
Step 4: Stick One Edge First
Do not slap the whole label down at once. Press only one short edge first, just enough to anchor it.
This gives you control. If it looks off, you can still peel that one edge back and try again before it is too late.
Step 5: Smooth It Down Slowly
Now slowly roll the rest of the label onto the bottle, pressing as you go. Move in one steady direction. Do not jump around to different spots, since that traps air pockets between them.
Step 6: Press Out Every Bubble
Use your bone folder, an old gift card, or even just your thumb. Push from the center of the label outward toward the edges, almost like you are smoothing wrinkles out of a bedsheet.
This is how to avoid bubbles when applying labels almost every single time. Small bubbles near the edge can be pricked gently with a pin and pressed flat. Bubbles in the middle usually need you to peel back and restart that section.
How To Apply a Label to a Curved Bottle Without Wrinkles
Round and curved bottles are trickier because the label has to bend without folding.
Here is what helps:
- Use a label material made for curves, like a thin, flexible film
- Start at the back seam of the bottle, not the front
- Apply the label in small, gentle sections instead of one long sweep
- Smooth from the center outward on each section before moving to the next
Going slow is the real secret here. Rushing a curved bottle is the fastest way to end up with little folds that never lay flat again.
Bottle Label Application Tips for Busy Hands
If you are labeling more than a handful of bottles, here are a few small habits that save big time and stress.
- Lay out all your bottles and labels before you start, so you are not stopping to search for things
- Work in batches of ten, then take a short break so your focus stays sharp
- Keep a damp cloth nearby for sticky fingers
- Label in a room with steady temperature, not near a window or vent
These small steps protect your hands, your patience, and your bottles all at once.
Common Mistakes (And How To Fix Them)
Mistake: The label is crooked. Fix: Peel it back gently while it is still fresh and try again using your guide line.
Mistake: There is a stubborn bubble. Fix: Use a pin to poke a tiny hole and press the air out from the center toward that hole.
Mistake: The label will not stick at all. Fix: Check if the bottle was clean and dry. Oily or dusty surfaces are almost always the real problem.
Mistake: The edges are lifting after a day. Fix: This usually means the bottle was too cold or the adhesive was not made for that bottle’s material.
When To Let The Pros Handle It
There is no shame in doing this by hand for a small batch. It can even feel proud and personal, like you made something with your own two hands. But once your orders grow, your time becomes just as valuable as your product.
If you find yourself spending hours fighting bubbles and crooked labels instead of growing your business, that is your sign. A trusted custom label application guide is helpful, but a real packaging partner saves you time, stress, and money in the long run.
Final Thoughts
Learning how to apply a label to a bottle correctly is not hard. It just takes a clean surface, a steady hand, and a little patience. Clean the bottle, find your guide line, press one edge, smooth slowly, and chase out every bubble. That is really all there is to it.
But if your hands are tired, your orders are growing, and you would rather spend your time building your brand instead of fighting with bubbles, we are here for you.
At Accuxel Prints and Design, we print and apply labels that fit your bottles perfectly, every single time. No bubbles. No crooked lines. Just clean packaging that makes your customers trust you the second they pick up your product.
Reach out to us at Accuxel Prints and Design today, and let’s get your bottles looking as good as what is inside them.